

Are you ready to indulge in a dessert that is both creamy and captivating? Jelly Leche Flan is not only a delightful treat but also an easy-to-make dessert that will impress your family and friends. This unique twist on traditional flan combines the rich flavors of custard with the playful texture of jelly, creating a crowd-pleaser for any occasion. Whether you’re hosting a festive gathering or simply craving something sweet, this versatile dessert is sure to satisfy. So, let’s dive into the world of Jelly Leche Flan and explore how to create this unforgettable dish!
Table of Contents
Key Benefits of Jelly Leche Flan
If you’re looking for a dessert that’s not only delicious but also incredibly versatile, Jelly Leche Flan is your answer! This delightful treat combines the creamy texture of traditional flan with the fun twist of jelly, making it a crowd-pleaser for any occasion. Here are some key benefits that make Jelly Leche Flan a must-try:
- Creamy Texture: The smooth, velvety consistency of Jelly Leche Flan is simply irresistible. It melts in your mouth, providing a satisfying experience with every bite.
- Rich Flavor: With the perfect balance of sweetened condensed milk and evaporated milk, this dessert offers a rich flavor that’s both comforting and indulgent.
- Easy to Make: You don’t need to be a culinary expert to whip up Jelly Leche Flan. The recipe is straightforward, making it accessible for bakers of all skill levels.
- Crowd-Pleaser: Whether it’s a family gathering or a festive celebration, Jelly Leche Flan is sure to impress your guests. It’s a unique dessert that stands out on any dessert table.
- Low-Cost Ingredients: Most of the ingredients are pantry staples, so you won’t break the bank making this delightful dessert. Additionally, you can easily find them at your local grocery store.
- Versatile Dessert: You can customize Jelly Leche Flan with various fruit toppings or flavor variations, allowing you to tailor it to your taste or the season.
In summary, Jelly Leche Flan is not just a dessert; it’s an experience. So, why not give it a try? You’ll be delighted by its creamy texture and rich flavor, and your friends and family will thank you for it!
Ingredients for Jelly Leche Flan
Creating the perfect Jelly Leche Flan starts with gathering the right ingredients. Each component plays a crucial role in achieving that creamy texture and rich flavor that makes this dessert so delightful. Here’s what you’ll need:
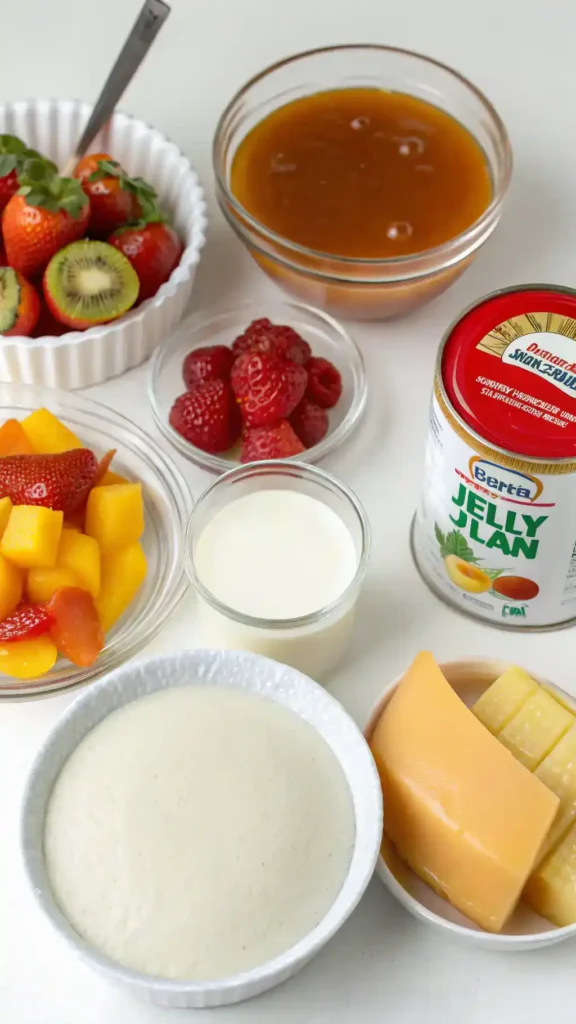
- 1 can (14 oz) sweetened condensed milk: This is the heart of your flan, providing sweetness and creaminess. If you’re looking for a lighter option, you can use a reduced-fat version.
- 1 can (12 oz) evaporated milk: This adds a rich, creamy base. Alternatively, you can substitute with whole milk, but the texture may vary slightly.
- 1 packet (0.25 oz) gelatin powder: This is essential for giving your flan that perfect jiggle. If you prefer a vegetarian option, look for agar-agar as a substitute.
- 1 cup sugar: This will be used for the caramel topping. For a unique twist, consider using brown sugar for a deeper flavor.
- 1 teaspoon vanilla extract: This enhances the overall flavor. You could also experiment with almond extract for a different taste.
- 1 cup water: This is needed to dissolve the gelatin. Ensure it’s warm to help the gelatin dissolve properly.
- Fruit toppings (optional): Fresh fruits like strawberries or mangoes can add a refreshing touch. They also make for a beautiful presentation!
When selecting your ingredients, freshness is key. Always check the expiration dates on your milk and gelatin. Additionally, feel free to get creative with flavors and toppings. The beauty of Jelly Leche Flan lies in its versatility, so don’t hesitate to make it your own!
How to Make Jelly Leche Flan
Making Jelly Leche Flan is a delightful experience that combines the creamy texture of flan with the fun twist of jelly. Follow these simple steps to create a dessert that will impress everyone!
- Prepare the Jelly: Start by dissolving the gelatin powder in hot water. Stir until fully dissolved, then let it cool slightly. This step is crucial, as it ensures a smooth jelly layer.
- Make the Flan Mixture: In a mixing bowl, combine sweetened condensed milk, evaporated milk, and vanilla extract. Whisk these ingredients together until they are well blended. This mixture will create the rich flavor of your Jelly Leche Flan.
- Combine the Mixtures: Gradually add the cooled gelatin to the flan mixture. Stir gently to combine, ensuring there are no lumps. This is an important step, as it helps achieve the perfect consistency.
- Layer the Jelly: Pour a thin layer of the gelatin mixture into your flan mold. Place it in the refrigerator for about 15-20 minutes, or until it starts to set. This layer will give your Jelly Leche Flan a beautiful base.
- Add the Flan Layer: Once the jelly has set, carefully pour the flan mixture over the jelly layer. Be gentle to avoid disturbing the jelly. This layering technique creates a stunning visual effect.
- Chill the Dessert: Cover the mold with plastic wrap and refrigerate for at least 4 hours, or overnight if possible. This chilling time allows the flavors to meld beautifully.
- Unmold and Serve: To serve, run a knife around the edges of the mold. Invert it onto a serving plate. If the flan doesn’t come out easily, dip the mold in warm water for a few seconds. This step is essential for a smooth release.
And there you have it! Your Jelly Leche Flan is ready to be enjoyed. Remember, the key to a successful dessert lies in the chilling time and gentle layering. So, take your time, and savor the process. Enjoy your delicious creation!
Pro Tips, Variations, and Common Problems
Making Jelly Leche Flan can be a delightful experience, but it’s essential to keep a few pro tips in mind to ensure your dessert turns out perfectly every time. Here are some insider tips to help you achieve that creamy texture and rich flavor that makes Jelly Leche Flan a crowd-pleaser.
Pro Tips for Success
– Always use fresh ingredients. Fresh eggs and high-quality milk will enhance the flavor significantly. Additionally, using fresh gelatin will ensure the best texture.
– When mixing your ingredients, blend them gently. Over-mixing can introduce air bubbles, which may affect the smoothness of your flan. Instead, whisk just until combined.
– For a beautiful caramel layer, cook the sugar slowly until it turns a deep amber color. Be careful not to burn it, as this can lead to a bitter taste.
– Allow your Jelly Leche Flan to chill for at least 4 hours, or overnight if possible. This helps it set properly and enhances the flavors.
Creative Variations
– For a fruity twist, consider adding pureed mango or strawberry to the flan mixture. This not only adds flavor but also a lovely color.
– You can substitute coconut milk for half of the evaporated milk for a tropical flair. This variation pairs beautifully with a sprinkle of toasted coconut on top.
– If you’re feeling adventurous, try infusing your flan with different extracts, such as almond or orange, to create unique flavor profiles.
Troubleshooting Common Problems
– If your flan has a grainy texture, it may be due to overcooking the eggs. To avoid this, temper the eggs by gradually adding a bit of the warm milk mixture before combining everything.
– Should you notice bubbles on the surface of your flan, this is often caused by over-mixing. Remember to mix gently and avoid whisking too vigorously.
– If the flan doesn’t set properly, it could be due to insufficient gelatin. Ensure you measure your gelatin accurately and allow it to bloom in cold water before adding it to the mixture.
– Lastly, if your flan sticks to the mold, try running a knife around the edges before inverting it. This simple step can help release it smoothly.
By keeping these tips and variations in mind, you’ll be well on your way to mastering Jelly Leche Flan. Enjoy the process, and don’t hesitate to experiment with flavors and presentations!
Serving Suggestions for Jelly Leche Flan
When it comes to serving your delightful Jelly Leche Flan, presentation is key. Not only does it enhance the visual appeal, but it also elevates the overall dining experience. Here are some creative serving ideas to impress your guests and make this dessert truly shine.
Plating Ideas
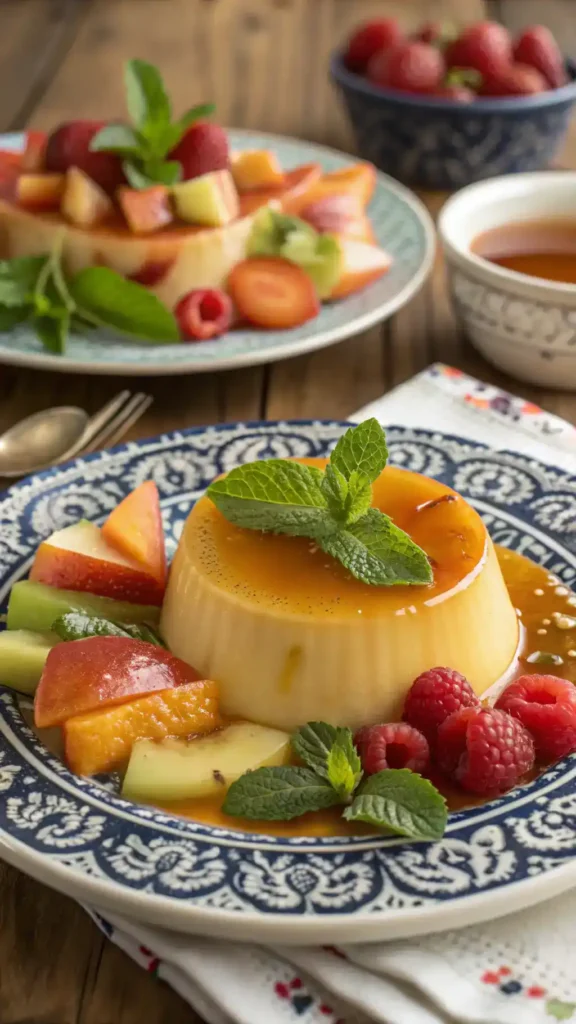
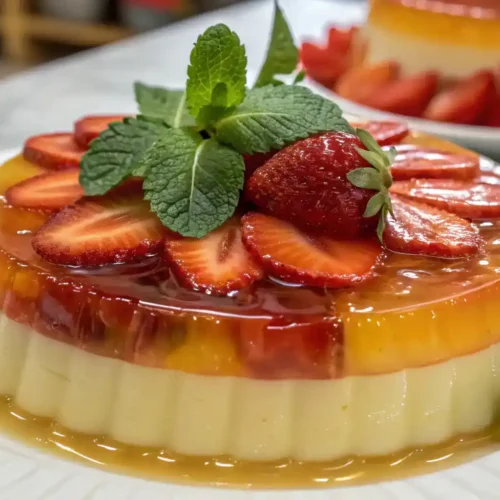
Start by carefully unmolding your Jelly Leche Flan onto a beautiful plate. The glossy surface should be facing up, showcasing its smooth texture. For an elegant touch, consider:
- Drizzling caramel sauce around the flan for a sweet contrast.
- Sprinkling fresh mint leaves on top for a pop of color.
- Adding edible flowers for a whimsical presentation.
Additionally, you can slice the flan into wedges and serve them on individual dessert plates. This not only looks sophisticated but also makes it easy for guests to enjoy.
Side Dish Pairings
While Jelly Leche Flan is a star on its own, pairing it with complementary flavors can enhance the experience. Consider serving it alongside:
- Fresh fruit salad, featuring tropical fruits like mango, pineapple, and berries.
- A scoop of vanilla ice cream for a delightful contrast in temperature and texture.
- Whipped cream, which adds a light and airy element to the rich flan.
These pairings not only add variety but also create a well-rounded dessert plate.
Creative Serving Options
Depending on the occasion, you can adapt your serving style. For casual gatherings, serve Jelly Leche Flan family-style in a large dish, allowing guests to help themselves. Alternatively, for more formal events, consider:
- Using elegant glass cups to present individual servings, showcasing the beautiful layers.
- Creating a dessert buffet with various toppings, such as chocolate sauce, crushed nuts, and fruit purees, allowing guests to customize their flan.
Moreover, you can even incorporate themed decorations based on the occasion, such as festive plates for holidays or simple, chic settings for dinner parties.
Presentation Tips
Finally, remember that the little details matter. Use a sharp knife to ensure clean cuts when slicing the flan. Additionally, serve it chilled for the best flavor and texture. As a finishing touch, consider:
- Garnishing with a sprinkle of toasted coconut for added crunch.
- Serving with a side of coffee or tea to balance the sweetness.
By following these serving suggestions, your Jelly Leche Flan will not only taste incredible but also look stunning on the table. So, gather your friends and family, and get ready to impress them with this delightful dessert!
Preserving Jelly Leche Flan
Storing and reheating your delightful Jelly Leche Flan properly is essential to maintain its creamy texture and rich flavor. So, let’s dive into the best practices for keeping this dessert fresh and delicious!
Storage Tips
To keep your Jelly Leche Flan at its best, refrigeration is key. First, make sure it’s completely cooled before storing. Then, place it in an airtight container to prevent any unwanted odors from seeping in. Ideally, it should be consumed within 3 to 5 days when stored in the fridge. If you want to keep it longer, consider freezing it. When freezing, wrap the flan tightly in plastic wrap and then place it in a vacuum-sealed bag or an airtight container. This method helps prevent freezer burn. In the freezer, Jelly Leche Flan can last for up to 2 months. However, remember to label your container with the date, so you know when to enjoy it! Additionally, always check for any signs of spoilage, such as an off smell or unusual texture, before consuming.
Reheating Methods
When it comes to reheating your Jelly Leche Flan, the goal is to warm it gently to preserve its delicate texture. One effective method is to use the oven. Preheat your oven to 300°F (150°C). Next, place the flan in an oven-safe dish and cover it with aluminum foil to retain moisture. Heat it for about 15 to 20 minutes, checking occasionally to ensure it doesn’t overcook. Alternatively, you can reheat it on the stovetop. Simply place the flan in a non-stick skillet over low heat, adding a splash of water to create steam. Cover the skillet and let it warm for about 10 minutes, checking frequently. If you’re short on time, the microwave is also an option. Just remember to use a microwave-safe dish and heat it in 15-second intervals, checking after each interval to avoid overheating. Regardless of the method you choose, adding a bit of moisture, like a drizzle of milk or cream, can help refresh the flan and keep it from drying out. Enjoy your perfectly reheated Jelly Leche Flan just like it was freshly made!
Conclusion
In summary, making Jelly Leche Flan is a delightful culinary adventure that combines the creamy texture of flan with the fun twist of jelly. By following the simple steps of mixing sweetened condensed milk, evaporated milk, and gelatin, you can create a rich dessert that is not only easy to make but also a crowd-pleaser for any occasion. Moreover, this recipe is versatile; you can customize it with your favorite fruit toppings or flavor variations. So, I encourage you to gather your ingredients and give it a try! You might just discover a new favorite dessert.
Share Your Experience
I would love to hear how your Jelly Leche Flan turns out! Feel free to share your results or ask any questions you may have along the way. Additionally, don’t hesitate to experiment with different flavors or pairings to make this dessert truly your own. Remember, cooking is all about creativity and enjoyment, and Jelly Leche Flan is a perfect canvas for your culinary expression. Happy cooking!
Frequently Asked Questions about Jelly Leche Flan
Here are some common questions about Jelly Leche Flan, along with helpful answers to guide you through making this delightful dessert.
1. What is Jelly Leche Flan?
Jelly Leche Flan is a delicious dessert that combines the creamy texture of traditional leche flan with the lightness of jelly. It features layers of smooth custard made from sweetened condensed milk and evaporated milk, topped with a flavorful gelatin layer. This unique twist makes it a crowd-pleaser!
2. Can I use different flavors of gelatin?
Absolutely! You can experiment with various flavors of gelatin to create a Jelly Leche Flan that suits your taste. For instance, fruit-flavored gelatin like strawberry or mango adds a refreshing twist. Just remember to adjust the sweetness accordingly, as some flavors may be sweeter than others.
3. How do I prevent bubbles in my flan?
To avoid bubbles in your Jelly Leche Flan, mix the ingredients gently. Additionally, when pouring the mixture into the mold, do it slowly to minimize air incorporation. If bubbles do form, you can tap the mold gently on the counter to release them before chilling.
4. Can I make Jelly Leche Flan ahead of time?
Yes, you can prepare Jelly Leche Flan a day in advance! In fact, letting it chill overnight enhances the flavors and allows it to set properly. Just be sure to cover it with plastic wrap to prevent it from absorbing any odors from the refrigerator.
5. What are some serving suggestions for Jelly Leche Flan?
For a beautiful presentation, consider garnishing your Jelly Leche Flan with fresh fruits, whipped cream, or a drizzle of chocolate sauce. You can also serve it with a side of caramel sauce for added sweetness. These touches not only enhance the flavor but also make it visually appealing!
Jelly Leche Flan
Equipment
- 1 Flan mold For shaping the flan.
- 1 Mixing bowl For combining ingredients.
- 1 Whisk For mixing the flan mixture.
- 1 Refrigerator For chilling the flan.
Ingredients
Base Ingredients
- 1 can (14 oz) sweetened condensed milk Provides sweetness and creaminess.
- 1 can (12 oz) evaporated milk Adds a rich, creamy base.
- 1 packet (0.25 oz) gelatin powder Essential for giving the flan its jiggle.
Caramel Topping
- 1 cup sugar Used for the caramel topping.
- 1 teaspoon vanilla extract Enhances overall flavor.
- 1 cup water Needed to dissolve the gelatin.
Optional Toppings
- to taste fruit toppings Fresh fruits like strawberries or mangoes.
Instructions
Prepare the Jelly
- Start by dissolving the gelatin powder in hot water. Stir until fully dissolved, then let it cool slightly.
Make the Flan Mixture
- In a mixing bowl, combine sweetened condensed milk, evaporated milk, and vanilla extract. Whisk these ingredients together until they are well blended.
Combine the Mixtures
- Gradually add the cooled gelatin to the flan mixture. Stir gently to combine, ensuring there are no lumps.
Layer the Jelly
- Pour a thin layer of the gelatin mixture into your flan mold. Place it in the refrigerator for about 15-20 minutes, or until it starts to set.
Add the Flan Layer
- Once the jelly has set, carefully pour the flan mixture over the jelly layer.
Chill the Dessert
- Cover the mold with plastic wrap and refrigerate for at least 4 hours, or overnight if possible.
Unmold and Serve
- To serve, run a knife around the edges of the mold. Invert it onto a serving plate.
Video
Notes
| Calories | Fat | Protein | Carbs |
|---|---|---|---|
| 200 | 8g | 4g | 30g |