
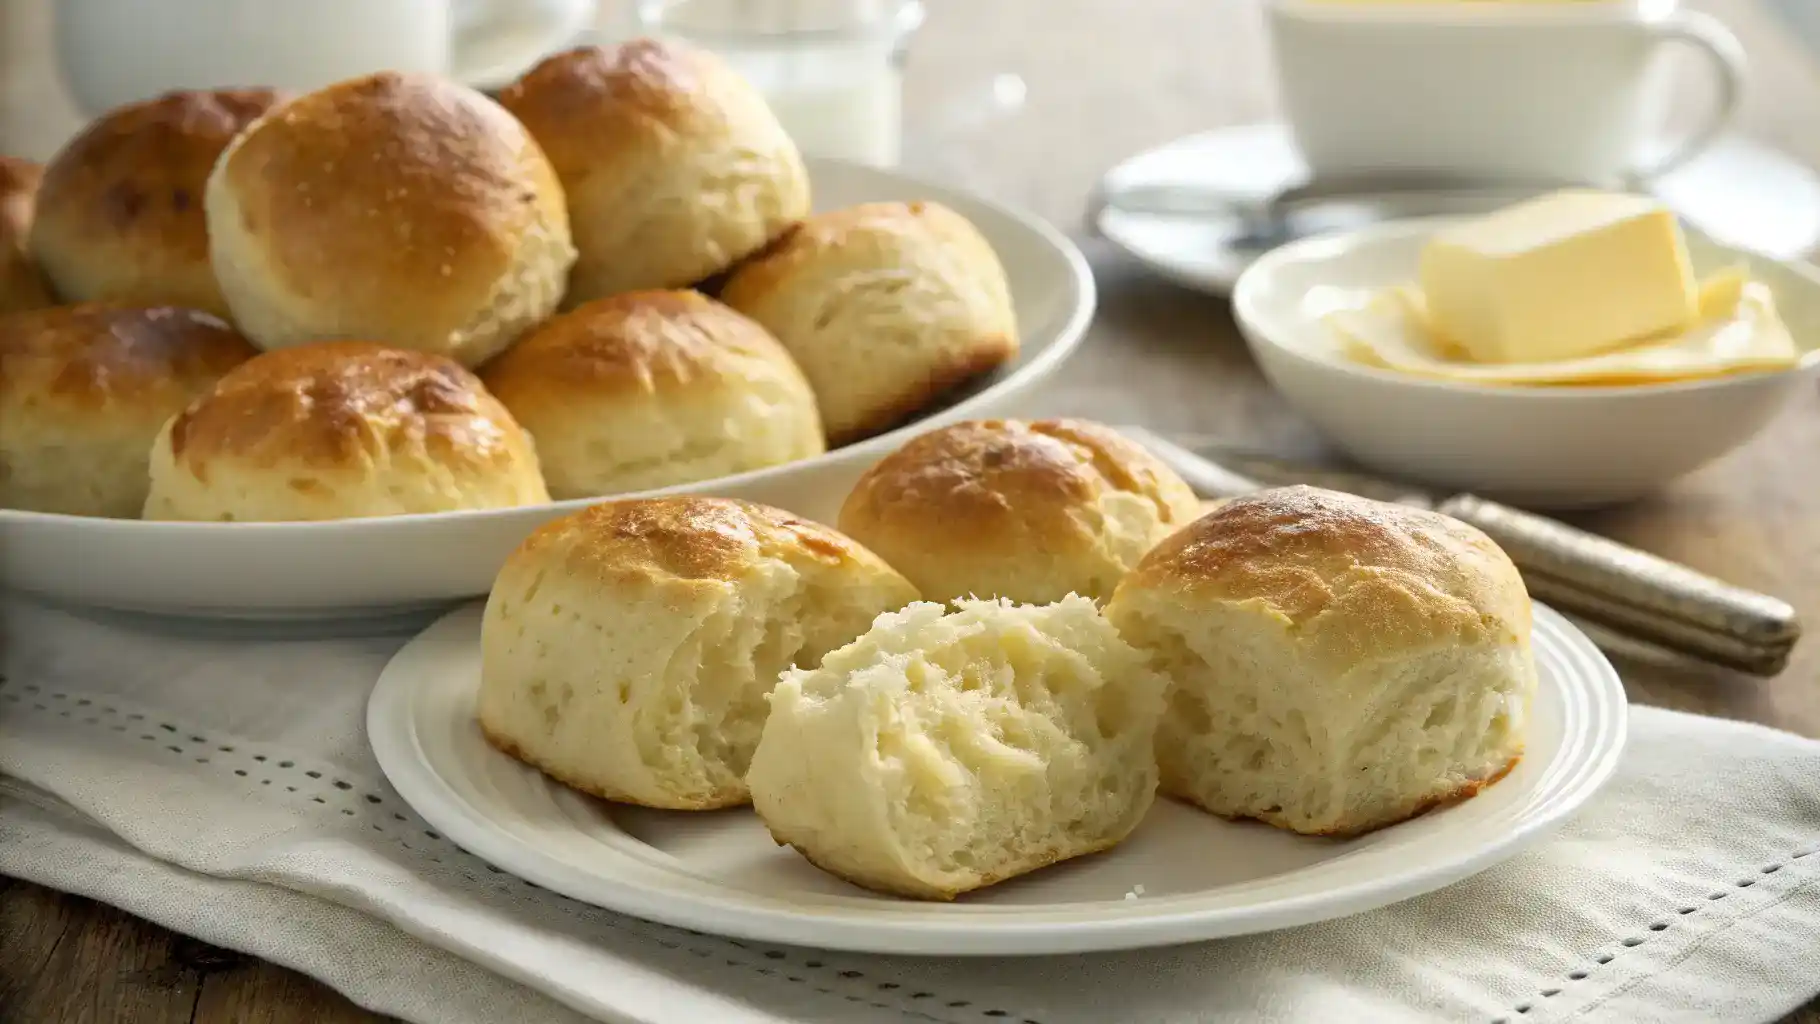
Have you ever craved warm, fluffy rolls but dreaded the long wait for yeast to rise? Well, you’re in luck! No yeast rolls offer a quick and easy alternative to traditional bread, allowing you to enjoy delicious rolls without the hassle. Not only are they beginner-friendly, but they also provide a lighter option that’s easy to digest. Whether you’re a busy cook or simply looking for a time-saving recipe, these rolls are perfect for any occasion. So, let’s dive into the world of no yeast rolls and explore how you can whip up a batch in no time!
Table of Contents
Key Benefits
No yeast rolls are a delightful alternative to traditional yeast-based bread, and they come with a host of benefits that make them a favorite in many kitchens. Firstly, they offer quick preparation, which is perfect for busy cooks. You can whip up a batch in no time, allowing you to enjoy fluffy, delicious rolls without the wait. Additionally, these rolls are easy to digest, making them a lighter option for those who may have sensitivities to yeast.
Moreover, no yeast rolls are incredibly versatile. You can customize them with various herbs or spices to suit your taste, making them suitable for any meal. For instance, you can serve them as dinner rolls, breakfast options, or even sliders. Furthermore, they are beginner-friendly, so even if you’re new to baking, you can achieve great results without feeling overwhelmed.
In summary, no yeast rolls not only save you time but also provide a satisfying baking experience. They are fluffy, flavorful, and adaptable, making them a wonderful addition to your culinary repertoire. So, if you’re looking for a quick and easy bread solution, no yeast rolls are the way to go!
Ingredients for No Yeast Rolls
Creating delightful no yeast rolls starts with a few simple ingredients that you likely already have in your kitchen. Here’s what you’ll need:
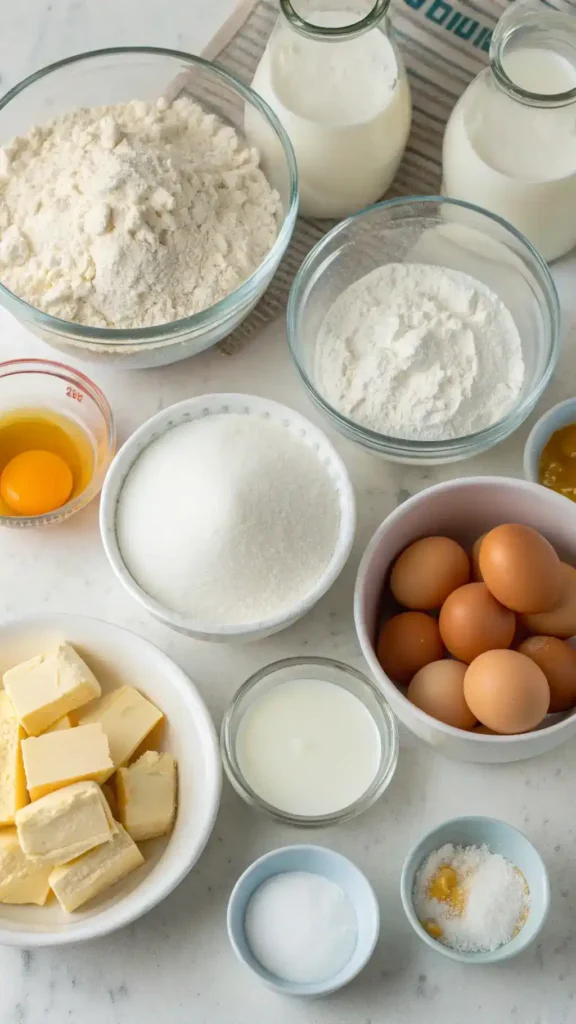
- All-purpose flour: This is the backbone of your rolls. It provides structure and a fluffy texture. If you’re looking for a healthier option, you can substitute half with whole wheat flour.
- Baking powder: This is your leavening agent, giving the rolls that light and airy quality. Make sure it’s fresh for the best results.
- Salt: A pinch of salt enhances the flavor of your rolls. It’s essential for balancing the sweetness and richness of the other ingredients.
- Milk: This adds moisture and richness. You can use whole milk, but alternatives like almond or oat milk work just as well.
- Butter: Melted butter adds a lovely flavor and helps keep the rolls tender. If you prefer a dairy-free option, coconut oil is a great substitute.
- Sugar: Just a touch of sugar helps to balance the flavors. You can omit it if you’re looking for a savory roll.
- Optional herbs: Feel free to add herbs like rosemary or garlic powder for an extra flavor boost. This makes your no yeast rolls even more versatile!
When selecting your ingredients, always opt for the freshest options available. For instance, check the expiration date on your baking powder. Additionally, if you’re experimenting with flavors, consider mixing in some cheese or spices to create a unique twist on your no yeast rolls. Remember, these rolls are not only quick to prepare but also easy to digest, making them a perfect choice for any meal!
How to Make No Yeast Rolls
Making no yeast rolls is a delightful and straightforward process. Follow these simple steps to create fluffy, delicious rolls that are perfect for any meal. Let’s get started!
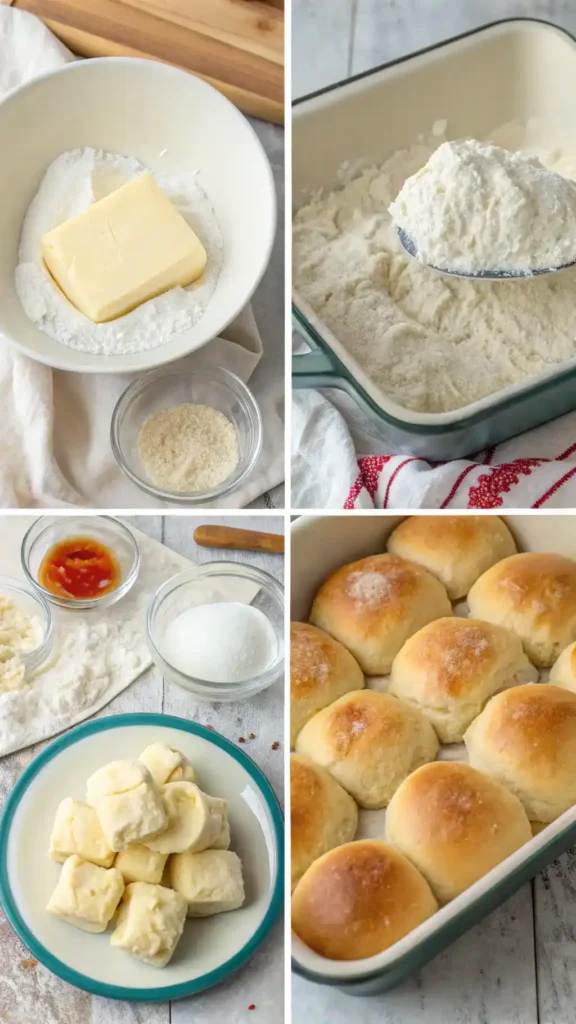
- Gather Your Ingredients: First, you’ll need all-purpose flour, baking powder, salt, milk, butter, and sugar. Optionally, consider adding herbs for extra flavor. Having everything ready makes the process smoother.
- Mix the Dry Ingredients: In a large mixing bowl, combine 2 cups of all-purpose flour, 1 tablespoon of baking powder, and 1 teaspoon of salt. Whisk these together until they are well blended. This step is crucial for an even texture.
- Add the Wet Ingredients: Next, pour in 1 cup of milk and 2 tablespoons of melted butter. If you’re using sugar, add 1 tablespoon now. Stir gently until the mixture forms a soft dough. It’s important not to overmix, as this can affect the rolls’ fluffiness.
- Knead the Dough: Turn the dough out onto a lightly floured surface. Knead it gently for about 1 minute. You want to bring it together without making it tough. If the dough is too sticky, sprinkle a little more flour as needed.
- Shape the Rolls: Divide the dough into 8 equal pieces. Roll each piece into a ball and place them on a greased baking sheet. Make sure to leave some space between each roll, as they will expand while baking.
- Bake the Rolls: Preheat your oven to 375°F (190°C). Bake the rolls for 15-20 minutes or until they are golden brown on top. Keep an eye on them, as baking times may vary slightly based on your oven.
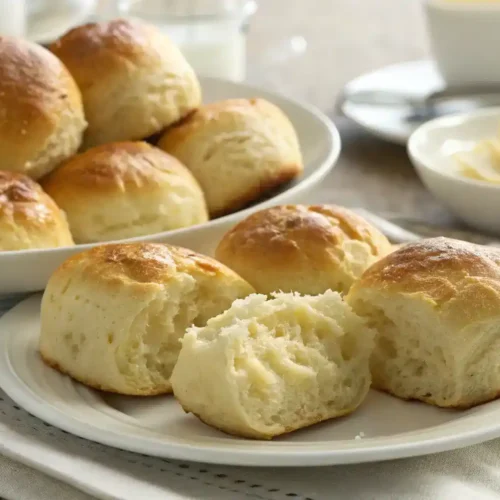
- Cool and Serve: Once baked, remove the rolls from the oven and let them cool for a few minutes. Serve them warm with butter or your favorite spread. These no yeast rolls are best enjoyed fresh!
By following these steps, you’ll create no yeast rolls that are not only easy to make but also incredibly satisfying. Remember, practice makes perfect, so don’t hesitate to experiment with flavors and textures!
Pro Tips, Variations, and Common Problems
Making no yeast rolls can be a delightful experience, but like any recipe, it comes with its own set of challenges. Here are some pro tips and variations to help you achieve the perfect fluffy texture, along with solutions to common problems you might encounter.
Pro Tips
– Use Fresh Ingredients: Always check the expiration date on your baking powder. Fresh baking powder is crucial for achieving that fluffy texture in your no yeast rolls.
– Adjust Flour for Texture: If your dough feels too sticky, add a little more all-purpose flour, but do so gradually. This adjustment can help you achieve the right consistency without overworking the dough.
– Knead Gently: Knead the dough just enough to bring it together. Over-kneading can lead to tough rolls, which is something you definitely want to avoid.
– Experiment with Flavors: Consider adding optional herbs like rosemary or thyme to elevate the taste of your no yeast rolls. You can also incorporate cheese or garlic for a savory twist.
Creative Variations
– Cheesy No Yeast Rolls: Mix in shredded cheese into the dough for a cheesy delight. Cheddar or mozzarella works wonderfully!
– Sweet Rolls: For a sweeter version, add a tablespoon of sugar and a dash of cinnamon. These can be perfect for breakfast or as a dessert.
– Herb-Infused Rolls: Add finely chopped fresh herbs to the dough for a fragrant touch. Basil, parsley, or chives can make your rolls stand out.
Common Problems and Solutions
– Dough is Too Sticky: If your dough is too sticky to handle, don’t panic! Simply sprinkle in a bit more flour until it reaches a workable consistency.
– Overbaking: To avoid dry rolls, keep an eye on them as they bake. Start checking for doneness a few minutes before the recommended time. They should be golden brown and sound hollow when tapped.
– Flavor Issues: If your rolls taste bland, consider adding a pinch of salt or herbs to the dough. Additionally, brushing melted butter on top right after baking can enhance the flavor significantly.
– Dense Texture: If your no yeast rolls turn out dense, it might be due to overmixing. Remember, mix just until combined for the best results.
By following these tips and being mindful of common pitfalls, you’ll be well on your way to mastering no yeast rolls. Enjoy the process, and don’t hesitate to get creative with your ingredients! Happy baking!
Serving Suggestions for No Yeast Rolls
No yeast rolls are not only quick to prepare but also incredibly versatile, making them a delightful addition to any meal. To elevate your dining experience, consider these serving suggestions that will impress your guests and satisfy your family.
Plating Ideas
Firstly, serve your no yeast rolls warm, straight from the oven. This enhances their fluffy texture and makes them irresistible. For a rustic touch, place them in a wooden basket lined with a clean cloth. Alternatively, you can arrange them on a beautiful platter, garnished with fresh herbs like rosemary or thyme for a pop of color.
Side Dish Pairings
Moreover, no yeast rolls pair wonderfully with a variety of dishes:
- Soups: Serve them alongside a hearty vegetable soup or creamy tomato bisque for a comforting meal.
- Salads: They complement fresh salads beautifully, adding a satisfying element to your greens.
- Main Courses: Use them as a side for roasted chicken or grilled steak, where their fluffy texture balances the richness of the meat.
Creative Serving Options
Additionally, think about how you present your no yeast rolls. For a casual gathering, stack them in a basket with a side of flavored butter, such as garlic herb or honey butter. For a more elegant setting, consider serving them with a selection of dips, like hummus or a savory cheese spread.
Furthermore, if you’re hosting a family-style dinner, place the rolls in the center of the table, allowing everyone to help themselves. This not only encourages sharing but also creates a warm, inviting atmosphere.
Breakfast Options
Lastly, don’t overlook the breakfast potential of no yeast rolls! Slice them in half and toast lightly. Then, spread with jam or cream cheese for a delightful morning treat. You can even use them as a base for breakfast sliders, filled with scrambled eggs and cheese.
In conclusion, no yeast rolls are a fantastic, versatile option that can enhance any meal. With these serving suggestions, you can create a memorable dining experience that showcases their fluffy texture and delightful flavor. Enjoy your baking adventure!
Preserving and Reheating No Yeast Rolls
No yeast rolls are a delightful treat that can be enjoyed fresh or saved for later. To ensure they maintain their fluffy texture and rich flavor, proper storage and reheating techniques are essential. Let’s dive into how to keep your no yeast rolls fresh and how to reheat them like a pro!
Storage Tips
To store your no yeast rolls, start by placing them in an airtight container. This method keeps them fresh at room temperature for up to three days. If you want to keep them longer, freezing is your best bet. Wrap each roll tightly in plastic wrap and then place them in a freezer-safe bag. This way, they can last for up to three months without losing quality. Additionally, if you have a vacuum sealer, using it can significantly extend their shelf life by removing air and preventing freezer burn.
When it comes to food safety, always ensure your rolls are completely cooled before storing them. This step is crucial because warm rolls can create condensation, leading to mold growth. Furthermore, if you notice any signs of spoilage, such as an off smell or unusual texture, it’s best to discard them to avoid any health risks.
Reheating Methods
Now, let’s talk about reheating those delicious no yeast rolls! The oven is one of the best methods to preserve their softness. Preheat your oven to 350°F (175°C). Wrap the rolls in aluminum foil to keep moisture in, and place them on a baking sheet. Heat for about 10-15 minutes, or until warmed through. This method ensures they remain fluffy and delightful.
If you’re short on time, the microwave can be a quick alternative. Place a roll on a microwave-safe plate and cover it with a damp paper towel. Heat for about 15-20 seconds. However, be cautious not to overheat, as this can lead to dryness. Alternatively, if you have an air fryer, you can reheat your rolls at 300°F (150°C) for about 5 minutes. This method gives them a nice crisp exterior while keeping the inside soft.
For an extra touch, consider adding a bit of moisture before reheating. A small pat of butter or a sprinkle of water can work wonders in refreshing the rolls. Overall, with these storage and reheating tips, you can enjoy your no yeast rolls just as much as the day they were baked!
Conclusion
As we wrap up our delightful journey into the world of no yeast rolls, let’s take a moment to appreciate how simple and rewarding this recipe truly is. By combining all-purpose flour, baking powder, and milk, you’ve created a soft, fluffy dough that requires no waiting time. The straightforward steps of mixing, kneading, and baking make this a perfect choice for both novice and experienced bakers alike. Moreover, the versatility of no yeast rolls allows you to customize them with herbs or spices, making them a fantastic addition to any meal.
Now, I encourage you to try making these rolls yourself! Cooking is all about exploration and creativity, so don’t hesitate to share your results or ask any questions you might have. Whether you enjoy them warm with butter, as a side to your favorite soup, or even as sliders, these rolls are sure to impress.
Additionally, feel free to experiment with different flavors or pairings to make the recipe your own. Remember, the kitchen is a place for fun and innovation, and no yeast rolls are a wonderful canvas for your culinary creativity. So, roll up your sleeves and get baking—your taste buds will thank you!
Frequently Asked Questions About No Yeast Rolls
Here are some common questions about no yeast rolls, along with helpful answers to guide you through your baking journey.
1. What can I use instead of milk in no yeast rolls?
If you need a dairy-free option, you can substitute milk with almond milk, soy milk, or even water. Each alternative will slightly change the flavor, but they will still yield delicious no yeast rolls.
2. How do I achieve a fluffy texture in my no yeast rolls?
To ensure your no yeast rolls are fluffy, make sure you use fresh baking powder. Additionally, avoid overmixing the dough; mix just until combined. This will help maintain a light and airy texture.
3. Can I add herbs or spices to my no yeast rolls?
Absolutely! Adding herbs like rosemary or thyme can enhance the flavor of your no yeast rolls. You can also incorporate spices such as garlic powder or onion powder for an extra kick. Just remember to adjust the amount of salt accordingly.
4. What should I do if my dough is too sticky?
If your dough is sticky, don’t worry! Simply add a little more all-purpose flour, a tablespoon at a time, until you reach the desired consistency. It’s important to find the right balance for easy handling.
5. How can I store and reheat no yeast rolls?
To store your no yeast rolls, place them in an airtight container at room temperature for up to three days. For longer storage, freeze them. When reheating, wrap them in foil and warm them in the oven to keep them soft and delicious.
no yeast rolls
Equipment
- 1 Mixing bowl For combining dry and wet ingredients.
- 1 Baking sheet To bake the rolls.
- 1 Whisk For mixing dry ingredients.
- 1 Rolling Pin For shaping the dough.
Ingredients
Dry Ingredients
- 2 cups All-purpose flour Provides structure and fluffy texture.
- 1 tablespoon Baking powder Leavening agent for lightness.
- 1 teaspoon Salt Enhances flavor.
Wet Ingredients
- 1 cup Milk Adds moisture; alternatives like almond or oat milk can be used.
- 2 tablespoons Butter Melted for flavor and tenderness.
- 1 tablespoon Sugar Optional, for balancing flavors.
- to taste Optional herbs Like rosemary or garlic powder for added flavor.
Instructions
Preparation
- Gather your ingredients: all-purpose flour, baking powder, salt, milk, butter, and sugar. Optionally, consider adding herbs for extra flavor.
Mix Dry Ingredients
- In a large mixing bowl, combine the flour, baking powder, and salt. Whisk until well blended.
Add Wet Ingredients
- Pour in the milk and melted butter. If using sugar, add it now. Stir gently until a soft dough forms.
Knead the Dough
- Turn the dough onto a floured surface and knead gently for about 1 minute.
Shape the Rolls
- Divide the dough into 8 pieces, roll into balls, and place on a greased baking sheet.
Bake the Rolls
- Preheat oven to 375°F (190°C) and bake for 15-20 minutes until golden brown.
Cool and Serve
- Remove from oven, let cool for a few minutes, and serve warm.
Video
Notes
| Calories | Fat | Protein | Carbs |
|---|---|---|---|
| 150 | 5g | 3g | 22g |